 Is Your Chain Damaged Or Worn Out?

It is important to find out exactly how worn it is.
The best way to find out is to use a chain wear indicator. It sits in the chain and determines how far apart the chain links have stretched. If it's between 0.5% and 0.75%, you should be able to change the chain and not worry about the rest of the drivetrain. If it's over 0.75% you will probably find that you need to change your cassette and - granted this would be a worst case scenario - you may even have to change your chainrings.
That being said, it is a good idea to replace your chain when it has only very recently reached the 0.5% mark.
Tools Needed:
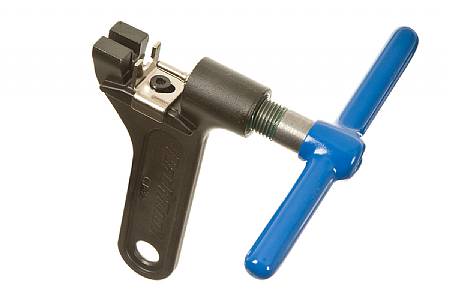
Chain tool
Bike Stand (optional)
Steps:

The B-tension screw alters the distance between the upper guide pulley and the first sprocket on the cassette. Make sure this is set correctly BEFORE removing your chain, so you don't have to guess when installing the new one.
2. Check that the chain isn't too long or too short
Put your chain on the smallest gear on the front and rear derailleurs. The chain should still have a good amount of tension. If the chain is too long, the rear mech will pull up and the chain will brush up against the bottom derailleur.
To check that it isn't too short, you need to put your cassette and crank on the largest gears. The rear mech should be under a lot of tension, but still have enough give to prevent the chain from being stretched.
If your chain is "just right" - you can use your old chain to measure your new chain.
 3. Decide where the old chain is going
If you are throwing this chain into a bucket of parts and never plan to use it again, that's fine. But if you would like to use it on a different bike, make sure that you do not dislocate the original joining pin. The original joining pin looks just different enough from the rest of the pins.
 Removing the chain

4. Attach your chain tool to a link of chain other than the original pin. Make sure it lines up level and flat and drive the pin all the way out. You may need a new joining pin depending on the chain you have.
Measure Twice, Cut Once
 5. Once you have the correctly fitted new chain ready to install on your chainless bike, grab one end of the chain and feed it through the derailleurs. Start with the rear, feeding the chain up and over the first jockey wheel, and then under and around the second jockey wheel.
From there, the chain should go back again towards the rear of the bike to go up and over the smallest cog in the cassette, and stretch towards the front of the bike over the lowest front gear.
Since you did not alter your B-tension screw, the tension is still properly set and you can measure your chain to be sure you cut just enough off to fit your bike.
When measuring in the smallest of both the front and rear gears, you must remember to leave a couple chain links length for the extra distance the chain will travel when it moves up to the bigger gears. (Some say it is best to do your measuring on the largest of the gears. We'll leave it up to you. Or, try both!)
Finshing Up
6. Remove the pin of the link you have selected (remember that some chains use quick release chain links which need double male ends of the chain, and others connect male to female)
7. Attach the chain together using a QR Chain Link or with a new joining pin.

(7.5) For QR Chain links, once connected, you may have to run the chain through a few pedal cycles to get it to finish locking together. The best way to do so is to run the link to the top of the loop, and alternate pedal direction to snap it into place. You will find a small arrow on one of the links that indicates the direction the chain should go.
8.With the new chain fitted, everything should work as it did before. You just want to make sure that when you go for the largest gear in your drivetrain that there is enough slack in the system that there are no problems or damage caused to the bikes.
Now you're ready to get back out there!

Circle City Bicycles and Fitness
5506 Madison Ave.
Indianapolis, IN 46227
(317) 786-9244
No comments:
Post a Comment